General Instagram hacks
1. Stop seeing posts and/or Stories from specific accounts you follow
Mute annoying users without the risk of offending them with an unfollow.
How to do it:
- Tap the … icon in the corner of a post from the account you want to mute
- Click mute
- From there, you can choose whether to mute posts, or mute posts and Stories from the account
- You can also mute posts and Stories by pressing and holding on a Story in your tray, or from a profile
2. Rearrange the order of your filters
Put your most-used filters up front for faster posting.
How to do it:
- When posting a photo or video, go to Filter
- Scroll to the end of your filters and tap Manage
- Press and hold the three line icon next to each filter on the left-hand side of the screen to rearrange the order of your filters
- Check or uncheck the circles next to each filter on the right-hand side of the screen to hide or unhide filters
- Click Done to save your settings
3. See all the posts you’ve liked
Looking for inspiration? Why not review what’s already inspired you.
How to do it:
- Go to your profile
- Tap the gear icon on iOS or the three dots on Android to go to Options
- Tap Posts You’ve Liked
4. Clear your search history
Don’t let anyone who has access to your phone know how obsessed you are with your frenemies.
How to do it:
- Tap your profile image icon to go to your profile
- Tap the gear icon on iOS or the three dots on Android to go to Options
- Scroll to the bottom, then tap Clear Search History
5. Hide specific search queries
Permanently remove specific searches (accounts, hashtags, places, etc.) from appearing in the search bar.
How to do it:
- Tap the magnifying glass icon to visit the search page
- Tap the search bar at the top of the screen
- Tap and hold the search you’d like to hide from your history (below Top or Recent), then tap Hide
6. Get notifications when your favorite users post new content
Never miss a post from your favorite people and brands!
How to do it:
- Visit the the profile page of the account you’d like to get notifications for
- Tap the three dots icon in the upper right-hand corner of the screen
- Select Turn on Post Notifications
Note: If you’ve changed your mind, the option to turn off notifications lives in the same spot.
7. Add and manage multiple accounts
You don’t need to log in and out to switch between accounts.
How to do it:
- Tap the person icon at the bottom of the screen to visit your profile
- Tap the gear icon on iOS or the three dots on Android to go to Options
- Scroll to the bottom and select Add Account
- Enter the username and password for the account you’d like to add
- Once you’ve added a second (or third, fourth, or fifth) account, the profile icon in the navigation bar will change from the silhouette of a person to your profile image
- To switch between accounts, go to your profile
- Tap your username at the top of the screen
- Tap the account you’d like to switch to
Note: You can add up to five accounts.
8. Pin your Instagram post to Pinterest
Pinterest isn’t listed as one of the network choices when sharing a post from Instagram, but there are workarounds for both Instagram mobile and desktop.
How to do it on mobile:
- Go to the post you’d like to Pin
- Tap the three dots icon located above your post to the right
- Select Copy Share URL to copy the post link to your clipboard
- Open the Pinterest app on your mobile device
- Tap on your profile image icon to visit your profile
- Tap the plus sign icon at the top right of the screen to add a new Pin
- An “Add a board or Pin” menu will appear, select Copied link
- Pinterest will automatically open the link saved to your clipboard
- Choose the image you’d like to Pin and finish posting as usual
How to do it on desktop:
- Visit Instagram.com and find the post you’d like to Pin
- Right click on the post and select Open Link in New Window
- Use the Pinterest browser button to choose the image you’d like to Pin and finish posting as usual
9. Delete comments
Whether you need to hide an offensive comment or erase a typo, deleting comments is easy.
How to delete your own comment:
- Tap the speech bubble icon beneath the post you commented on
- Find the comment you’d like to delete
- Swipe to the left over the comment
- Tap the trash can icon
How to delete another user’s comment on your post:
- Tap the speech bubble icon beneath the post containing the comment you’d like to delete
- Swipe to the left over the comment
- A partial swipe will bring up a trio of options, allowing you to reply, flag, or delete a comment
- Tap the trash can icon—or continue swiping to the left—to delete the comment
10. Filter and block comments based on keywords
Dealing with a social media troll? Comment controls allow you to filter and block comments containing specific keywords.
How to do it:
- Select your profile image icon to visit your profile
- Tap the gear icon on iOS or the three dots on Android to go to Options
- Choose Comment Controls
- Toggle the Hide Offensive Comments option on
- This feature will hide comments that contain words or phrases that are often reported as offensive
- You can also choose to add your own list of custom keywords that you’d like hidden from your posts
11. Turn off comments on a particular post
How to do it:
- Begin posting a photo or video as usual
- When you reach the screen where you add a caption, location, and other tags, select Advanced Settings
- Toggle the Turn Off Commenting option on

Note: you can change this setting even after a post has been published by going to the post, tapping the three dot icon above it, and selecting Turn On Commenting. You can also turn off comments on a previously published post by following these same steps.
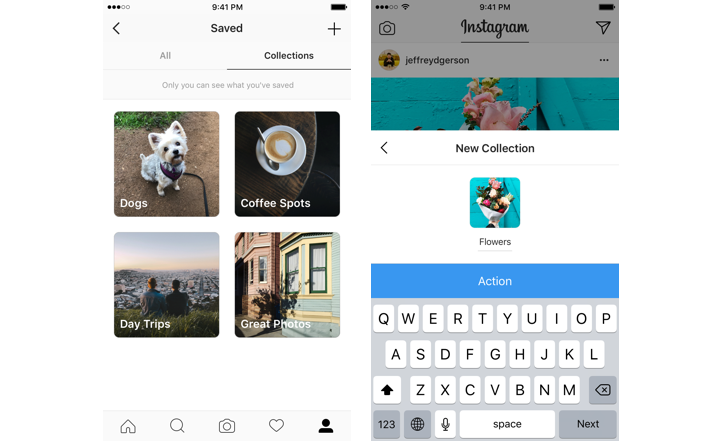
12. Save and organize posts where only you can see them
The perfect hack for squirrelling away bits of inspiration. Or use this feature to keep tabs on your competitors.
How to do it:
- Go to a post you’d like to save
- Tap the bookmark icon underneath the post you want to save
- Add the post to an existing collection or tap the + icon to create and name a new one
- To see your saved posts and collections, visit your profile and tap the matching bookmark icon (next to the Photos of You icon) to go the Saved tab
13. Remove old posts from your profile without deleting them
This is possible thanks to Instagram’s archive feature.
How to do it:
- Tap … at the top of the post you want to remove
- Select Archive
- Tap the Archive icon in the top right corner of your profile to review all archived posts
- If you want to restore content to your public profile, simply tap Show on Profile at any time and it’ll show up in its original spot
14. Zoom in on a post
How to do it:
- Go to the post you’d like to zoom in on
- Pinch using two fingers and slowing the pull them farther apart
- Enjoy the details
Instagram hacks for photo and video sharing
15. Make your captions more readable with line breaks
If you favor the long-form caption a la National Geographic, this hack will make your posts more readable.
How to do it:
- Edit your photo and proceed to the caption screen
- Write your caption
- To access the Return key, tap the 123 key on your device’s keyboard
- Use Return to add breaks to your caption
Note: The breaks will start a new line, but not create the white space that you would see between two paragraphs. If you want a paragraph break, write out your caption in a note app and copy it to Instagram. To break up lines further, consider using punctuation, such as bullet points or dashes, to hold the place of an empty line.
16. Schedule Instagram posts
Too busy to post at a time when your audience is active on Instagram? Use Hootsuite to schedule photos direct to Instagram.
How to do it:
Note: Check out our guide to scheduling posts on Instagram to learn how to do this from a personal account.
17. Use individual photos to make a larger one
Get creative and have fun with Instagram’s grid format.
How to do it:
- To share a #triplegram, simple share three related images consecutively so that they take up an entire line with a single unified look
- To share a grid post series, try cropping a single image into nine (apps like these can make the process easy) and share them in quick succession

For a closer look at how brands have made good use of the grid layout, check out 7 Lessons Brands Can Learn from the Most Creative Accounts on Instagram.
18. Adjust the intensity of filters
For those who want something close to—but not quite—the #nofilter look.
How to do it:
- After uploading or taking a photo, tap the filter you’d like to use
- Tap the filter again to open edit options
- Use the sliding scale to adjust the intensity of the filter
- Tap Done to add the filter to your post and continue your edits
19. Upload or capture a post with multiple scenes
It’s an Instagram Story that never disappears!
How to upload a post with multiple photos and video clips:
- Tap the + icon in the navigation bar at the bottom of the screen
- Tap SELECT MULTIPLE on the Library tab
- Choose the photos and videos from your camera roll that you want to include in your Story
- Choose and edit your filters (you can choose a different filter for each photo or video or make it consistent across the entire post)
- Once you’ve selected your videos, you can tap to trim them or press and hold to reorder
- To delete a clip, drag it to the centre of the screen
- Finish your edits as usual and share your masterpiece
How to record a video with multiple clips:
- Tap the + icon at the bottom of the screen
- Tap Video
- Tap the circle icon to begin recording
- To take multiple clips, lift your finger off the circle icon to pause, then press and hold it when you want to begin recording again
- To delete a previous clip in your video, tap Delete, then tap again to confirm
20. Share videos without sound
If the audio is bad and/or doesn’t add to the viewing experience, you may as well remove so it’s not a distraction.
How to do it:
- Tap the + icon at the bottom of the screen to select the video you’d like to upload
- Tap Next
- Tap the volume control icon at the top of the screen to mute the video’s sound
Note: This can also be done in Instagram Stories. After recording a video, simply tap the volume control icon at the top of the screen to mute.
21. Save drafts for later
You’ve snapped the perfect shot and edited it to perfection, but the perfect caption eludes you. Save the post as a draft—with all your edits intact—and come back to it later.
How to do it:
Bonus: Download a free checklist that reveals the exact steps an adventure photographer used to grow from 0 to 110,000 followers on Instagram with no budget and no expensive gear.
Get the free checklist right now!- Tap the + icon at the bottom of the screen to shoot or upload a photo or video
- Edit the post as you like, adding filters, captions, tags, or a location
- Hit the < icon in the upper left-hand corner of the screen to go back to the editing screen
- Hit the < icon again
- A pop-up menu will appear, select Save Draft
- When you’re ready to continue with your edits and share your post, tap the + icon, then select Library
- A new DRAFTS section will now appear above CAMERA ROLL
- Tap your desired post, or select Manage to view all of your saved drafts
- Select a post, edit, and share as usual
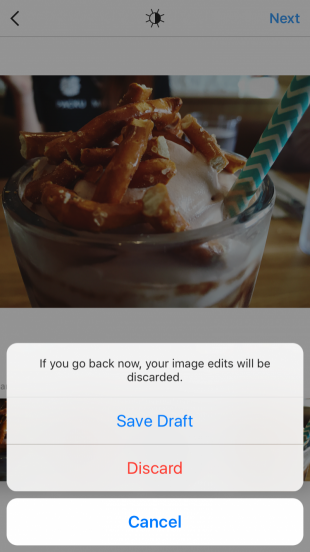
Note: To delete a post from your saved posts, select Manage to go to Drafts, then tap Edit. Select the posts you’d like to get rid of and tap Discard Posts at the bottom of the screen, then tap again to confirm.
22. Blur the background on a portrait photo
How to do it:
- Open the camera and select Focus among the options under the record button
- Take a selfie or switch to the rear-facing camera to snap a photo of someone else
- The subject will stay in focus while the background blurs
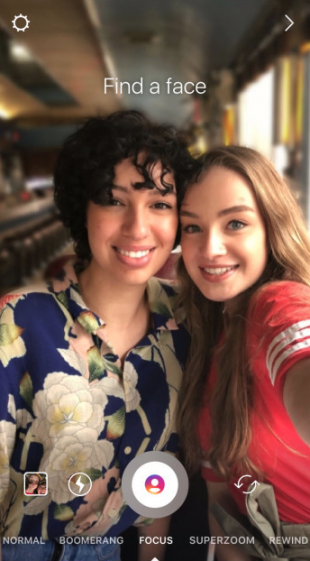
Note: this feature is only available on select Android devices, iPhone SE, 6S, 6S+, 7, 7+, 8, 8+, and X.
23. Request to join another user’s Live video (or encourage followers to join yours)
Brands can use this feature when partnering with other businesses or influencers for announcements, Instagram takeovers, and the like. Or, encourage your followers to join a live Q&A you’re hosting.
How to request to join a live video:
- When watching a live video, tap Request in the comments section
- You’ll see a confirmation when the user accepts and you’ll have a moment to prepare
- Once you’re live, the screen will split in half
- You can leave the live video at any time
How to accept a request from a follower to join your live video:
- When hosting your own live video, you’ll see a notification for each request in the comments section
- Tap View and then choose to add the requestor or cancel the request
- The icon with two smiley faces will have a red number showing how many requests you have
- Tap the icon, and you’ll see both requests and current viewers
- You can either accept a request or invite any viewer to join you. You can remove a guest and add someone else at any time
24. Save your live video
How to do it:
- After your live broadcast ends, tap Save in the upper right corner
- After saving, tap Done and your live video will be saved to your camera roll but will no longer be available in the app
Instagram Story hacks
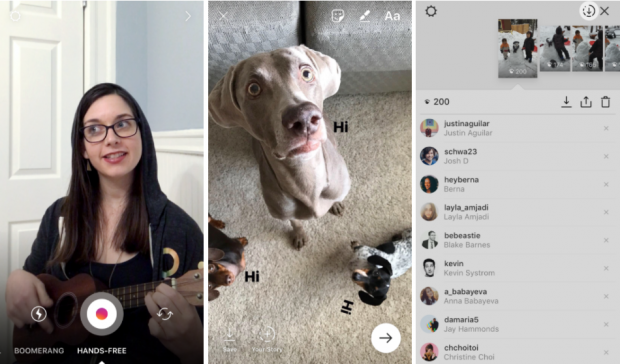
25. Record video hands-free
How to do it:
- Swipe right from your home screen to open the Instagram Stories camera
- Swipe through the options at the bottom of the screen—normal, Boomerang, etc.—and stop at the HANDS-FREE recording option
- Tap the record button at the bottom of the screen to begin recording
- To stop recording, either let the maximum time run out or tap the capture button again
26. Add as much text as you want to posts in Stories
How to do it:
- Swipe right from your home screen to go to the Instagram Stories camera
- Snap an image or record a video
- Tap the screen to add text OR tap the Aa icon in the upper right-hand corner
- Write your desired text
- Tap the > icon
- Repeat as many times as needed to add more text
27. Change the color of individual letters or words in your text
How to do it:
- Swipe right from your home screen to go to the Instagram Stories camera
- Snap an image or record a video
- Tap the screen to add text OR tap the Aa icon in the upper right-hand corner
- Write your text as usual
- Press and hold on a word or individual letter to select and highlight
- Choose your desired color
- Continue editing and share as usual
28. Add multiple stickers to an Instagram Story post
How to do it:
- Swipe right from your home screen to go to the Instagram Stories camera
- Snap an image or record a video
- Tap the smiley face sticker icon in the upper right-hand corner
- Choose your desired sticker
- If desired, tap the sticker to cycle through multiple options (for example, with the temperature sticker you can choose between celsius and fahrenheit)
- Resize and place your sticker as desired
- Repeat steps 3 through 6 as many times as you want

29. Change the colors or info displayed on a sticker
How to do it:
- Select a sticker to add to your post
- Tap it for different color options, or, in the case of things like the temperature sticker, you can choose between celsius and fahrenheit
30. Share someone else’s post in your feed on Instagram Stories
The Instagram Story version of a regram—great for sharing user-generated content or giving a shoutout to another relevant brand or influencer.
How to do it:
- Click on the paper airplane icon below the post you want to share
- Tap Add post to your story
- The post will appear as a sticker with a custom background
- You can rotate, scale, move the sticker, and tap it to explore other styles
- Once you’re happy with how it looks, tap the Your Story button to add it to your post. The post will show original poster’s username. When someone taps the post, they’ll be able to see the original post and more content from the person who created it.
Note: You can only share posts from public accounts. If you don’t want your posts shared on Instagram Stories by other people, you can opt out in settings.
31. Share a song or album from Spotify on Instagram Stories
Show off how hip your brand is.
How to do it:
- Open the Spotify app
- Find the song or album you want to share
- Tap the three dots to open the options menu
- Scroll down and tap Share
- Tap Instagram Stories
- This will open the Instagram app and you can add a sticker, text, or doodle to the image of the album you’re sharing (if you’re sharing a specific song, the app will still display the album it’s on)
- Then tap Your Story to add the song
32. Mention other accounts in your Story
For brands, this is great way to give a shout-out to another business or showcase an influencer in a takeover.
How to do it:
- Swipe right to open the Instagram Stories camera
- Take a photo or video
- Tap anywhere on the screen OR tap the Aa icon in the upper right-hand corner to add text
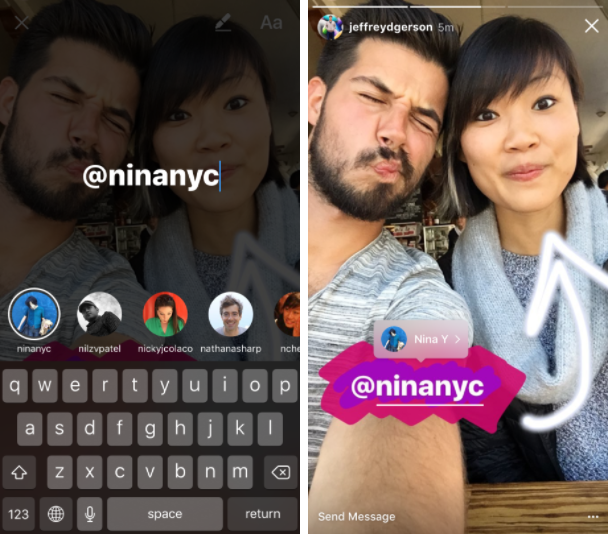
- Use your keypad and type the @ symbol immediately followed by the username of the account you’d like to mention
- Select the correct account from the menu
- When you mention someone, they’ll get a notification letting them know they’ve been tagged, as well as a direct message from you that includes a preview of your Story
33. Save your entire Story to your camera roll
In case you want to publish it on a different channel at a later date.
How to do it:
- Open your Story
- Swipe up on the screen
- Tap the arrow in a circle icon in the top right corner of the screen
Note: You can also save individual posts from your Story as you upload them by tapping the downward arrow icon in the bottom left corner of the screen. If you’ve already shared it, go to the photo or video you’d like to save, tap the three dots icon in the bottom right corner, and select Save Photo.
34. Share your Story to your profile
If your Story’s hot and you want everyone to see it—even those who don’t login during the 24 hours that it’s live—publish it on your profile.
How to do it:
- Open your Story
- Tap the three dots icon in the bottom right corner of the photo or video you’d like to share
- Tap Share as Post
- Edit—add filters, tags, a caption, etc.—and post as you normally would
35. Find out how your Story’s performing
Want to know how your Story’s doing? Check out this little-known feature to find out who’s watched it.
How to do it:
- Open your Story
- Swipe up on the screen
- Instagram will display the number of views as well as the names of people who have seen each photo or video in your Story
36. Zoom in and out on videos with a single finger
How to do it:
- Swipe right to open the Instagram Stories camera
- Hold down the capture button with one finger to begin recording video
- Slide up or down with the same finger to zoom in or out
37. Hide your Story from specific users
How to do it:
- Tap the person icon in the bottom right of your screen to go to your profile
- Tap the gear icon on iOS or the three dots on Android to access Options
- Tap Story Settings below Account
- Tap Hide My Story From
- Select the people you’d like to hide your Story from
- Tap Done
Note: You can also choose to hide your Story from people as you’re looking at who’s seen your Story. Just tap the three dot icon to the right of the person’s name and select Hide Story From [Username].
38. Pause, skip, and go back when watching Stories
You don’t have to watch Stories in a strict progression if you don’t want to.
How to do it:
- While viewing a Story, tap on the left side of the screen OR swipe right to go back to the previous photo or video
- Tap on the right side of the screen OR swipe left to skip ahead to the next part of the Story
- Tap and hold on the screen to pause a Story
39. Upload multiple photos and videos to your Story all at once
How to do it:
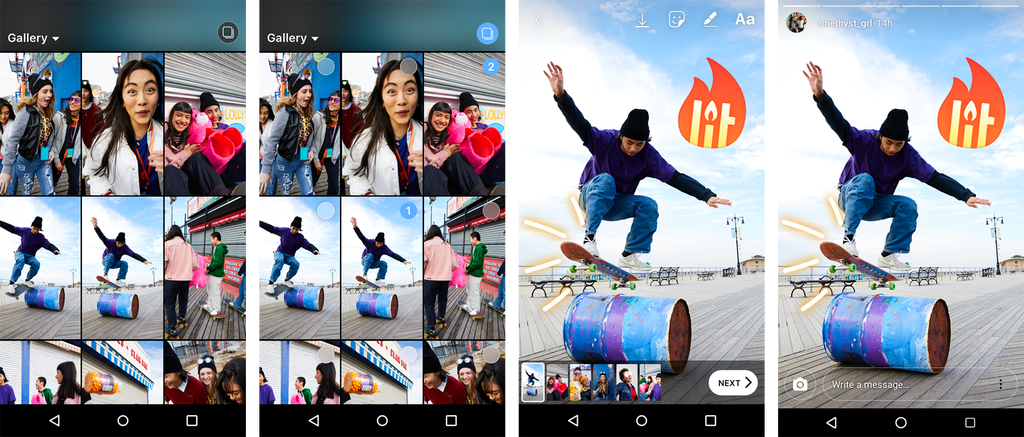
- Open Instagram Stories and tap to upload new media at top right corner of your screen
- Select up to 10 photos and videos from your camera roll
- On the edit screen, you’ll see a preview of all the media you’ve selected lined up at the bottom, you can tap each one to edit individually with stickers, text, etc.
- When you’re happy with them, you can preview the content, which will appear in the order you selected it
40. Add a text-only post to your Story
A picture says a thousands words, but sometimes you only want to say a few words.
How to do it:
- With Instagram Stories open, select Type under the capture button
- Tap the screen and write your message
- Click the button at the top-middle of the app to cycle through the various styles
- Choose a background color and text color(s)
- Press the > icon when you’re happy with the design to post it to your Story
41. Share any size photo or video without cutting anything out
Now you can share that wide-angle company photo without cutting out Gary from accounting.
How to do it:
- Upload your large photo or video and pinch to zoom out to share the original dimensions
- Any extra room will be filled with a custom color gradient that matches what you’re sharing
42. Pin your best Stories to the top of your profile
Brands can now keep their best Stories on their profiles for as long as they like with the Instagram Stories Highlights feature.
How to do it:
- Tap the New circle at the far left on your Instagram for business profile
- Choose any Stories from your archive (note: Stories from business profiles are automatically saved to the archive when they expire)
- Select a cover icon for your Highlight and give it a name
- Your Highlight will appear as a circle on your profile that plays as a stand-alone Story when someone taps it
- To edit or remove a Highlight, tap and hold it on your profile

Note: Highlights stay on your profile until you remove them, and you can have as many Highlights as you’d like. Check out these free Highlights cover icons to make sure yours really stand out.
43. Easily share your Instagram Story to your Facebook Story
You can do this for individual post, or set it up so all your Instagram Stories automatically our published on Facebook as well.
How to do it for a specific Story:
- Start creating a Story, then tap Next
- Tap Your Facebook Story
- Tap Share
How to set up automatic Facebook Story sharing:
- Go to your Instagram profile and tap the settings icon in the top-right corner
- Tap Story Settings
- Toggle on Share Your Story to Facebook
44. Share a replay of your live video on Instagram Stories
Another feature available to business accounts.
How to do it:
When you finish broadcasting a live video, simply tap Share at the bottom of your screen and the video will be added to your Story.
Note: The recording will be available for 24 hours. While it plays, it will display all the comments and likes from the original broadcast. Brands will also be able to see exactly how many people watched the video—both live and in Stories.
Note: The recording will be available for 24 hours. While it plays, it will display all the comments and likes from the original broadcast. Brands will also be able to see exactly how many people watched the video—both live and in Stories.
Instagram bio and profile hacks
45. Include a hashtag or profile link your bio
You can now link to a hashtag page or another account in your bio.
How to do it:
- Tap the profile icon to go to your profile
- Tap Edit Profile and go to the bio section
- Type # or @ and then a list of recommended hashtags and accounts will appear
- Once you select the hashtags and accounts you want, they will linked to in your bio
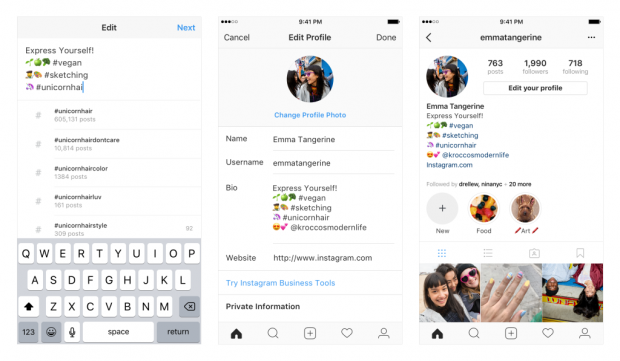
Note: When you mention someone else’s profile in your bio, they will receive a notification and can choose to remove the link. Their profile will remain in your bio but without a link.
46. Hide photos you’ve been tagged in (or remove the tag entirely)
Has your brand ever been tagged in an image that you’d rather not be associated with? There’s ways to remove it from your profile.
How to do it:
- Tap the person icon to visit your profile
- Tap the person in a box icon beneath your bio to go to the Photos of You tab
- Tap the photo you want to remove from your profile
- Tap the three dots icon in the upper right-hand corner and select Photo Options
- Select Hide from My Profile or Remove Me From Post if you want to untag yourself
Pro Tip: You can also choose whether or not you’d like tagged photos to appear on your profile. To do it, go to the Photos of You page, tap the three dots icon, select Tagging Options, then choose either Add Automatically or Add Manually.
47. Add line breaks in your bio to make it stand out
If you’d like to break up the block of text that is your bio, this hack is for you. Line breaks are a great way to include info in a visually appealing way.
How to do it on mobile:
- Open up a notes app and write out your bio as you’d like it to appear—line breaks included
- Select all the text and choose Copy
- Open the Instagram app
- Tap your profile image icon to visit your profile
- Tap the Edit Profile button
- Paste the text from your notes app into the bio field
- Tap Done to save your changes
How to do it on desktop:
- Visit your Instagram profile on the web
- Select Edit Profile
- Space your bio as you’d like it to appear
- Click Submit to save your changes
Note: Whether edited via mobile or on desktop, profiles viewed on desktop will appear without line breaks.
48. Include a link in your bio to drive traffic
Your bio is a great place to drive traffic to your website or another social channel with a link.
How to do it:
- Tap your profile image icon to visit your profile
- Tap the Edit Profile button
- Enter in the link you’d like to share
- Tap Done to save your changes
Pro tip: Include UTM parameters in the URL to track how much traffic is generated by the profile link.
49. Switch to a business profile to run ads and get analytics
If you’re a brand and still don’t have an Instagram business profile, you’re missing out on key features and insights. Make the switch now.
How to do it:
- Tap your profile image icon to visit your profile
- Tap the gear icon on iOS or the three dots on Android to go to Options
- Select Switch to Business Profile
- Tap Continue at the bottom of the screen
- Instagram will ask you to connect your Facebook account—you must connect a Facebook account to set up a business account on Instagram
- Once you’ve chosen the Facebook Page you want to connect, fill in the information requested by Instagram—you must provide a phone number, email, or physical address for your business
- Tap Done to save your profile and settings
For more tips on how to optimize your profile, check out our post of Instagram Bio Ideas for Business.
Instagram hashtag hacks
50. Find the best (and most relevant) hashtags
Because using the right Instagram hashtag will make your content more discoverable and allow you to grow your audience.
How to do it:
- Select the magnifying glass icon to visit the Explore tab
- Type in a keyword and tap the Tags column
- Choose a hashtag from the list
- This will take you to a page of posts bearing that hashtag
- Above the “Top” and “Recent” portions of the page, there appears a small bar labeled “Related.” Next to this, Instagram will display a list of relevant hashtags that you can swipe through for inspiration (and further research)
51. Follow your favorite hashtags
Great for content inspiration!
How to do it:
- Select the magnifying glass icon to visit the Explore tab
- Type in the hashtag you want to follow
- On the hashtag page click the Follow button
52. Save hashtags for future use
If you often use the same hashtags for every post, save them in a note to save time.
How to do it:
- Create a new note in the notes app on your mobile device
- Add all of your most-used captions to a running list
- Whenever you’re sharing a post, navigate from Instagram to the notes app, copy your text, then paste it in your caption
53. Hide hashtags
Don’t clutter your captions. Hide your hashtags to keep the reader focused on what’s important.
How to do it—method No. 1:
- One easy way to hide your hashtags is to simply leave them out of your caption altogether and put them in a comment below your post
- Once you’ve got another comment, your hashtags will be safely hidden in the comments section
How to do it—method No. 2:
- Another method is to separate your hashtags from the rest of your caption by burying them beneath an avalanche of line breaks
- Simply tap the 123 key when composing a caption
- Select Return
- Enter a piece of punctuation (whether a period, bullet, or dash), then hit Return again
- Repeat steps 2 to 4 at least five times
- Instagram hides captions after three lines, so your hashtags won’t be viewable unless your followers tap the more option on your post

Comments
Post a Comment